
그저 내가 되었고
항해99) 1주차:: 웹개발+ 2주차; SSR(Server Side Rendering) 본문
01. 2주차에 배울 것
* 동적 웹페이지의 종류:
- Client-side rendering(CSR): 자바스크립트에 데이터를 포함해서 보낸 후, 클라이언트 쪽에서 HTML을 완성하는 방법
- Server-side rendering (SSR): 서버 쪽에서 템플릿 HTML에 데이터를 끼워넣어 완성된 형태의 HTML을 보내주는 방법
- 복합적인 방법: 클라이언트 쪽에서 Ajax 요청을 보내서 서버에서 데이터를 받아와 HTML을 완성하는 방법
* Jinja2?
Flask 프레임워크에서 사용하는 템플릿 언어. '템플릿'이 되는 HTML 문서에 "여기에 데이터를 끼워 넣을거야!"라고 표시해주는 역할. 그 문법을 배워보자~!
* API 키?
- Open API라도 너무 많은 요청을 보내는 등의 악용을 방지하기 위해, API 키를 배부 받아 요청 시에 같이 보내줘야하는 경우가 있음(오늘 쓸 Owlbot 사전 API 등)
- 이 API 키를 1) 플라스크 서버에서 API로 요청을 보낼 때, 2) 클라이언트에서 API로 요청을 보낼 때 어떻게 같이 보내줘야하는지 알아야 함.
02. 플라스크로 멀티페이지 사이트 만들기 - 기초
1) 페이지 간 이동하기
메인 페이지에서 링크를 클릭하면 상세 페이지로 가고, 상세 페이지에서 다시 메인으로 갈 수 있게 하려면?
- 하이퍼링크(걍 진짜 하이퍼링크 붙은 텍스트 떨렁)
<a href="/detail">상세 페이지로 가기</a>
- 버튼
<!-- 버튼에 함수 연결하기 -->
<button onclick="to_main()">메인으로 돌아가기</button>
// script 태그 안에 정의하기
function to_main() {
window.location.href = "/"
}
- onclick에 바로 넣기(코드 짤막한 경우)
<button onclick='window.location.href = "/"'>메인으로 돌아가기</button>
2) Jinja2 템플릿 언어 이용하기
- html 파일에서 값 끼워줄 자리 표시하기
<h3>Hello, {{ name }}!</h3>👆🏻진자 템플릿 언어에서는, {{ (여기) }} 이렇게 중괄호 두 개로 데이터를 끼워 넣을 곳을 표시함.
- 서버에서 name이라는 이름으로 값을 보내줌.
@app.route('/')
def main():
    myname = "sparta"
    return render_template("index.html", name=myname)
👆🏻3째줄: myname이라는 변수에 sparta가 저장됨
4째줄: index.html 만들 때 name이라는 이름으로 myname이라는 변수도 같이 보내줘라!
+ 파이참 Settings(맥은 Preferences) > Languages & Frameworks > Template Languages에서 템플릿 언어를 Jinja2로 설정해주면 자동완성과 하이라이팅 기능을 사용할 수 있음.
04. 사전 API 사용하기
7) 파이썬으로 Owlbot API 요청
r = requests.get("https://owlbot.info/api/v4/dictionary/owl", headers={"Authorization": "Token [내토큰]"})
result = r.json()
print(result)
8) Ajax에서 Owlbot API 요청
$.ajax({
    type: "GET",
    url: "https://owlbot.info/api/v4/dictionary/owl",
    beforeSend: function (xhr) {
        xhr.setRequestHeader("Authorization", "Token [내토큰]");
    },
    data: {},
    error: function (xhr, status, error) {
        alert("에러 발생!");
    },
    success: function (response) {
        console.log(response)
    }
})
05. 프로젝트 2: 나만의 단어장
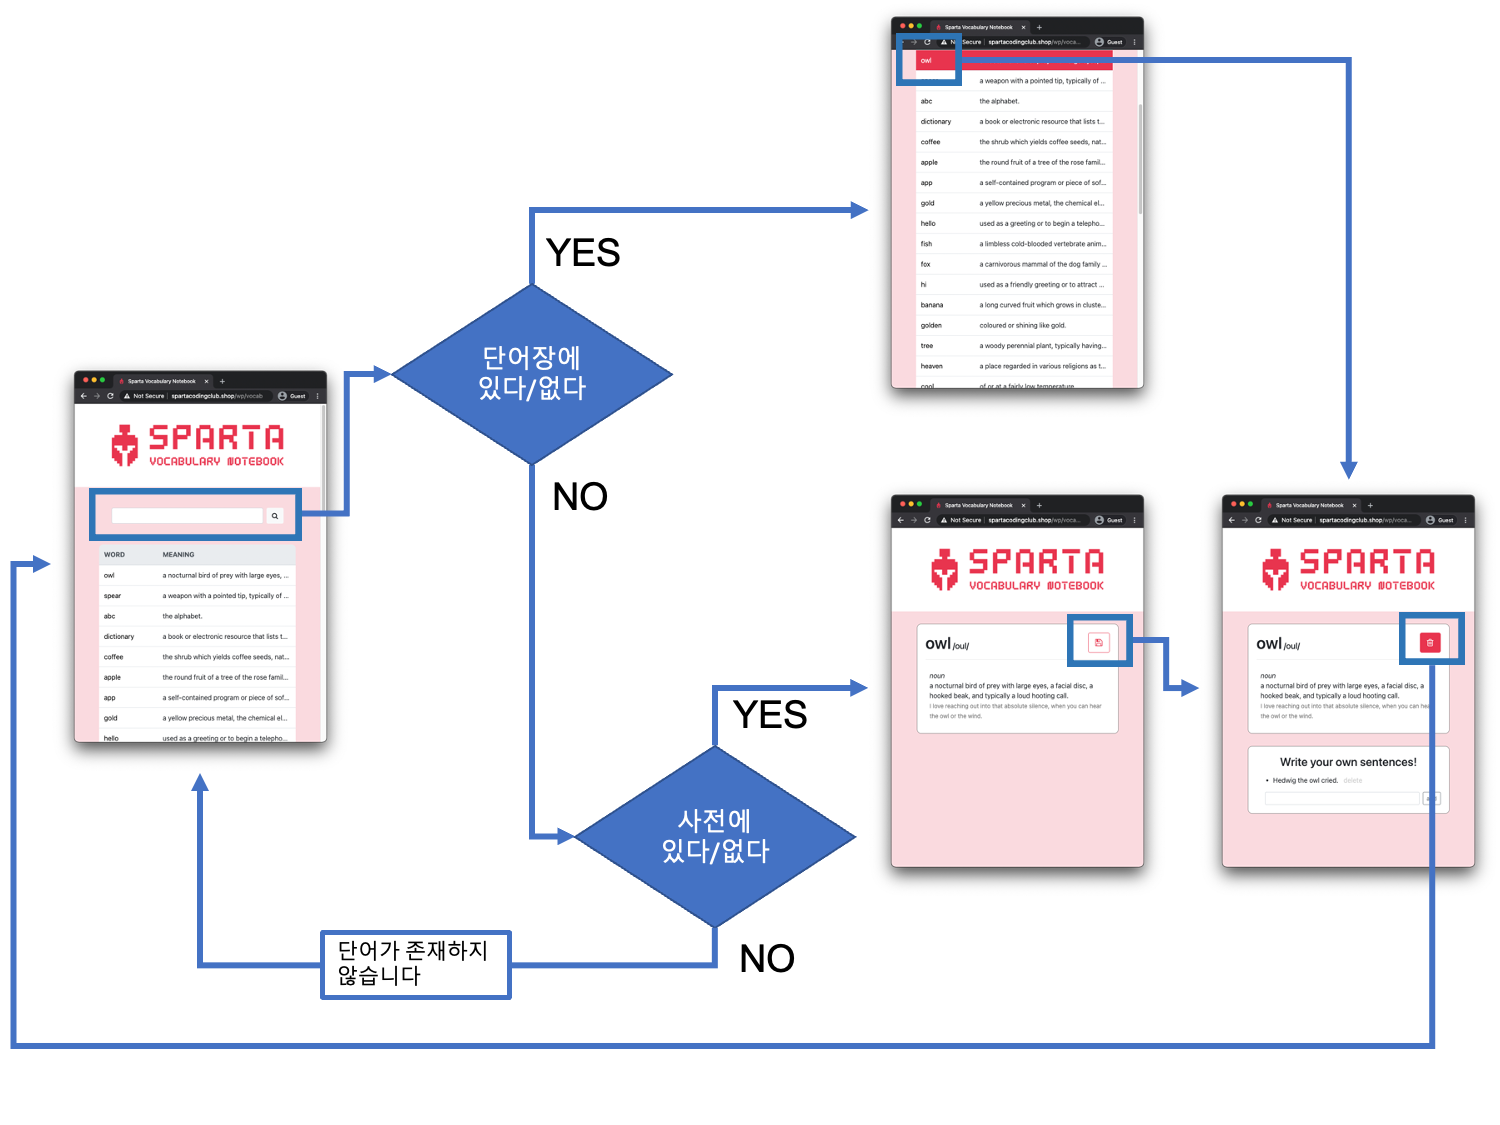
10) API 설계하기
- 메인 페이지:
- 사용자가 단어 검색
- 단어가 단어장에 이미 있는 단어인지 → 있으면 하이라이트, 없으면 상세 페이지로 이동
- 단어장에 있는 단어를 클릭했을 때 상세 페이지로 이동
- 상세 페이지:
06. 프로젝트 세팅
11) 프로젝트 준비 - app.py 준비하기
from flask import Flask, render_template, request, jsonify, redirect, url_for
from pymongo import MongoClient
import requests


app = Flask(__name__)

client = MongoClient('내AWS아이피', 27017, username="아이디", password="비밀번호")
db = client.dbsparta_plus_week2


@app.route('/')
def main():
    # DB에서 저장된 단어 찾아서 HTML에 나타내기
    return render_template("index.html")


@app.route('/detail/<keyword>')
def detail(keyword):
    # API에서 단어 뜻 찾아서 결과 보내기
    return render_template("detail.html", word=keyword)


@app.route('/api/save_word', methods=['POST'])
def save_word():
    # 단어 저장하기
    return jsonify({'result': 'success', 'msg': '단어 저장'})


@app.route('/api/delete_word', methods=['POST'])
def delete_word():
    # 단어 삭제하기
    return jsonify({'result': 'success', 'msg': '단어 삭제'})


if __name__ == '__main__':
    app.run('0.0.0.0', port=5000, debug=True)
12) 프로젝트 준비 - index.html, detail.html 준비하기
<!DOCTYPE html>
<html lang="en">
    <head>
        <meta charset="UTF-8">
        <meta name="viewport" content="width=device-width, initial-scale=1.0"/>
        <title>Sparta Vocabulary Notebook</title>

        <!-- Bootstrap CSS -->
        <link rel="stylesheet" href="https://maxcdn.bootstrapcdn.com/bootstrap/4.0.0/css/bootstrap.min.css"
              integrity="sha384-Gn5384xqQ1aoWXA+058RXPxPg6fy4IWvTNh0E263XmFcJlSAwiGgFAW/dAiS6JXm"
              crossorigin="anonymous">

        <!-- Optional JavaScript -->
        <!-- jQuery first, then Popper.js, then Bootstrap JS -->
        <script src="https://ajax.googleapis.com/ajax/libs/jquery/3.5.1/jquery.min.js"></script>
        <script src="https://cdnjs.cloudflare.com/ajax/libs/popper.js/1.12.9/umd/popper.min.js"
                integrity="sha384-ApNbgh9B+Y1QKtv3Rn7W3mgPxhU9K/ScQsAP7hUibX39j7fakFPskvXusvfa0b4Q"
                crossorigin="anonymous"></script>
        <script src="https://maxcdn.bootstrapcdn.com/bootstrap/4.0.0/js/bootstrap.min.js"
                integrity="sha384-JZR6Spejh4U02d8jOt6vLEHfe/JQGiRRSQQxSfFWpi1MquVdAyjUar5+76PVCmYl"
                crossorigin="anonymous"></script>

    </head>
    <body>
    </body>
</html>
07. 상세 페이지 전체 모습 만들기
14) 배경과 배너 넣기
- 배경&배너 HTML
<div class="wrap">
    <div class="banner" onclick="window.location.href = '/'">
    </div>
</div>
- 배경&배너 CSS
.wrap {
    background-color: RGBA(232, 52, 78, 0.2);
    min-height: 100vh;
    padding-bottom: 50px;
}

.banner {
    width: 100%;
    height: 200px;

    background-color: white;
    background-image: url('{{ url_for("static", filename="logo_red.png") }}');

    background-position: center;
    background-size: contain;
    background-repeat: no-repeat;

    cursor: pointer;
}
15) 단어 뜻 박스 만들기
<div class="container">
    <div class="d-flex justify-content-between align-items-end">
        <div>
            <h1 id="word" style="display: inline;">owl</h1>
            <h5 id="pronunciation" style="display: inline;">/oul/</h5>
        </div>
        <button id="btn-save" class="btn btn-outline-sparta btn-lg">save</button>
        <button id="btn-delete" class="btn btn-sparta btn-lg">delete</button>
    </div>
    <hr>
    <div id="definitions">
        <div style="padding:10px">
            <i>noun</i>
            <br>a nocturnal bird of prey with large eyes, a facial disc, a hooked beak, and typically a loud
            hooting call.<br>
            <span class="example">I love reaching out into that absolute silence, when you can hear the owl or the wind.</span>
        </div>
    </div>
</div>
.container {
    width: 80%;
    max-width: 800px;
    margin: 30px auto;
    padding: 20px;
    background-color: white;

    border: solid 1px gray;
    border-radius: 10px;
}

span.example {
    color: gray;
    font-size: 14px;
}

.btn-sparta {
    color: #fff;
    background-color: #e8344e;
    border-color: #e8344e;
}

.btn-outline-sparta {
    color: #e8344e;
    background-color: transparent;
    background-image: none;
    border-color: #e8344e;
}
16) 단어 저장, 삭제 버튼 대신 아이콘 삽입하기
- Font Awesome 이용: (css link단에 붙임-부트스트랩 등 모인 곳-)
<link href="//maxcdn.bootstrapcdn.com/font-awesome/4.7.0/css/font-awesome.min.css" rel="stylesheet">
- HTML에서는 클래스의 형식으로 들어감
<button class="btn btn-light" onclick="find_word()"><i class="fa fa-search"></i></button>{% if status == "new" %}
<button id="btn-save" class="btn btn-outline-sparta btn-lg" onclick="save_word()">
<i class="fa fa-floppy-o" area-hidden="true"></i>
</button>
{% else %}
<button id="btn-delete" class="btn btn-sparta btn-lg" onclick="delete_word()">
<i class="fa fa-trash-o" area-hidden="true"></i>
</button>
{% endif %}
09. 상세 페이지 - jinja2로 단어 뜻 가져오기
17) html에서 단어 뜻 보여주기 - jinja2 이용
- 우선 app.py에서 API에 요청을 보내 받은 응답을 보내줌
@app.route('/detail/<keyword>')
def detail(keyword):
    # API에서 단어 뜻 찾아서 결과 보내기
    r = requests.get(f"https://owlbot.info/api/v4/dictionary/{keyword}", headers={"Authorization": "Token 31820af68f30ba9b32505cf306964a1f5260edba"})
    result = r.json()
    return render_template("detail.html", word=keyword, result=result)
👆🏻jinja2를 이용해서 detail.html에 값을 채워 넣기 위해서는 detail.html에 연결된함수(그건 어케 아냐고? return render_template("detail.html", ~ 이걸 보면 알 수 있음) 안에 사전API에 요청을 보내고 값을 받아 올 부분이 필요함. 값은 json 데이터인 r 로 받아 result라는 변수에 저장할 것.
👆🏻주소 URL의 일부(앞부분만) 받아, keyword라는 변수로 저장해서 걔를 요청 보내는 URL 보내는 뒤에 잘 넣어둠.
👆🏻마지막으로 detail.html에 렌더 하도록 keyword는 word에, result는 result에 실어 보낸다. 이제 html로 넘어 가서 result 받아서 채워 넣어 주면 됨.
- HTML에서 결과가 들어가야할 부분을 표시
지금까지 진척도:
<div class="container">
    <div class="d-flex justify-content-between align-items-end">
        <div>
            <h1 id="word" style="display: inline;">owl</h1>
            <h5 id="pronunciation" style="display: inline;">/oul/</h5>
        </div>
        <button id="btn-save" class="btn btn-outline-sparta btn-lg">save</button>
        <button id="btn-delete" class="btn btn-sparta btn-lg">delete</button>
    </div>
    <hr>
    <div id="definitions">
        <div style="padding:10px">
            <i>noun</i>
            <br>a nocturnal bird of prey with large eyes, a facial disc, a hooked beak, and typically a loud
            hooting call.<br>
            <span class="example">I love reaching out into that absolute silence, when you can hear the owl or the wind.</span>
        </div>
    </div>
</div>
👆🏻여기서 네번째줄에 <h1>owl</h1>이것. owl을 그냥 {{ word }}로 하던지(진자2로 그렇게 서버에서 보냄) 아니면 {{ result.word }}도 가능(진자2가 API 줄 때 딕셔너리에 넣어서 주는데, 딕셔너리 안에 "word":~, "pronunciation":~... 이런 식으로 들어 있음. 글고 원래는 result["word"]로 해야 하지만 진자2는 딕셔너리 안의 키 값은 쉽게 그냥 result.word로 적어도 됨!!
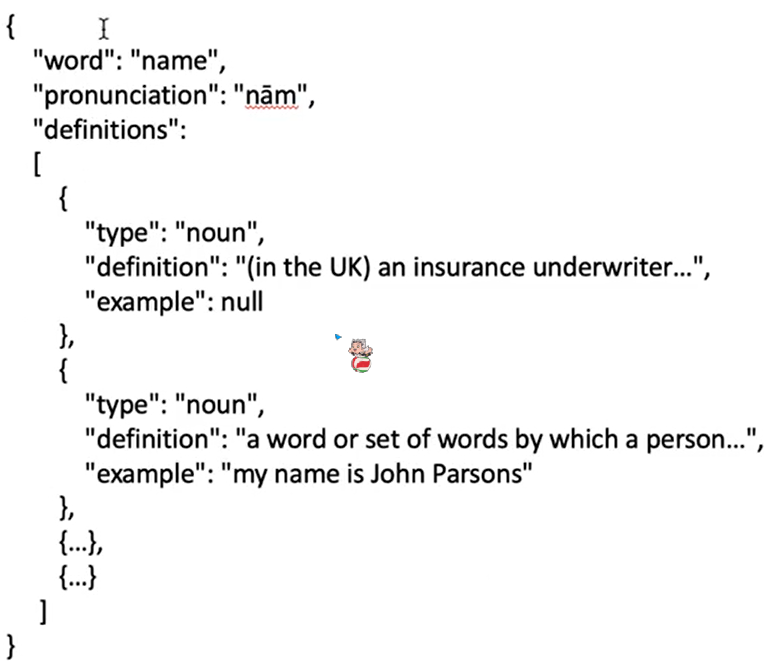
👆🏻{{ result.pronunciation }} 바꿔주고, definitions도 바꿔 주려고 했더니 얘는 각각 불러와야해서(?) 뭔말인지 이해 안됨... 암튼... 👇🏻이만큼 반복문 돌려야 한다고 함ㅠㅠ
<div style="padding:10px">
    <i>noun</i>
    <br>a nocturnal bird of prey with large eyes, a facial disc, a hooked beak, and typically a loud
    hooting call.<br>
    <span class="example">I love reaching out into that absolute silence, when you can hear the owl or the wind.</span>
</div>
돌린 결과는 이럼👇🏻
<div id="definitions">
    {% for definition in result.definitions %}
            <div style="padding:10px">
                <i>{{ definition.type }}</i>
                <br>{{ definition.definition }}<br>
                <span class="example">{{ definition.example }}</span>
            </div>
    {% endfor %}
</div>
여기까지 결과는 이렇다👇🏻
<div class="container">
    <div class="d-flex justify-content-between align-items-end">
        <div>
            <h1 id="word" style="display: inline;">{{ word }}</h1>
            <h5 id="pronunciation" style="display: inline;">/{{ result.pronunciation }}/</h5>
        </div>
        <button id="btn-save" class="btn btn-outline-sparta btn-lg">save</button>
        <button id="btn-delete" class="btn btn-sparta btn-lg" style="display:none;">delete</button>
    </div>
    <hr>
    <div id="definitions">
        {% for definition in result.definitions %}
		        <div style="padding:10px">
		            <i>{{ definition.type }}</i>
		            <br>{{ definition.definition }}<br>
		            <span class="example">{{ definition.example }}</span>
		        </div>
        {% endfor %}
    </div>
</div>
발음이 있는 경우에만 보여주도록 예외처리(해당 줄 앞뒤로 정말 저렇게만 딱 붙이는 것)👇🏻
{% if result.pronunciation %}
    <h5 id="pronunciation" style="display: inline;">/{{ result.pronunciation }}/</h5>
{% endif %}
👆🏻이것의 뜻은... result.pronunciation이 none이 아닌 것 뭔가 값이 있는 것 자체를 if문이 true로 생각함.
예문이 있는 경우에만 보여주도록 예외처리👇🏻
{% if definition.example %}
    <span class="example">{{ definition.example }}</span>
{% endif %}
예문에 HTML 태그 쓰는 것을 허용(definition.example이 html일 수 있는데 이상한 게 아니라 걍 꾸며주는거니까 허용해죠! 하는 것-볼드 등!!-)👇🏻
<span class="example">{{ definition.example|safe }}</span>
정의와 예문에서 깨진 글자를 없앰(일단 모든 문자열 아스키로 인코딩하되, 안되면 걍 인코딩 안하구 그대로 보여죠!)👇🏻
<br>{{ definition.definition.encode('ascii', 'ignore').decode('utf-8') }}<br>
{% if definition.example %}
    <span class="example">{{ definition.example.encode('ascii', 'ignore').decode('utf-8') }}</span>
{% endif %}
10. 상세 페이지 - 새 단어/기존 단어 구분하기
19) 단어에 따라 저장/삭제 버튼 숨기기
- 단어가 새 단어인지, 단어장에 있던 단어인지에 따라 보여주는 버튼이 달라야 함(old면 삭제 버튼만, new면 추가 버튼만 보이게). 우선 서버에서 status_give(이름은 임의다!!!! 지금 우리는 서버로 보낼 심부름꾼 만들어주는 중인거야!!!!)라는 이름으로 온 파라미터를 status_receive로 받아서 다시 status라는 이름으로 템플릿(html)에 보내줌.
status_receive = request.args.get("status_give")
return render_template("detail.html", word=keyword, result=result, status=status_receive)
👆🏻이만큼을 붙일거임. 결과는 👇🏻
@app.route('/detail/<keyword>')
def detail(keyword):
    status_receive = request.args.get("status_give")
     # API에서 단어 뜻 찾아서 결과 보내기
     r = requests.get(f"https://owlbot.info/api/v4/dictionary/{keyword}", headers={"Authorization": "Token 31820af68f30ba9b32505cf306964a1f5260edba"})
    return render_template("detail.html", word=keyword, result=result, status=status_receive)
- 그럴 일은 없지만, status_give라는 파라미터를 주지 않을 경우를 대비해, 기본값을 "new"로 주도록 함.
status_receive = request.args.get("status_give", "new")
- 템플릿에서 jinja2를 이용하여 상황에 맞는 버튼이 보이도록 함. onclick도 각각 설정해 줌.
{% if status=="new" %}
    <button id="btn-save" class="btn btn-outline-sparta btn-lg" onclick="save_word()">
        <i class="fa fa-floppy-o"></i>
    </button>
{% else %}
    <button id="btn-delete" class="btn btn-sparta btn-lg" onclick="delete_word()">
        <i class="fa fa-trash-o"></i>
    </button>
{% endif %}
11. 상세 페이지 - 저장 & 삭제 기능 만들기
: 위에서 status 따라서 버튼 달리 보이게 해줬고, 이제 그 버튼에 기능을 심어보자!
20) 단어 저장 기능 만들기: 목록 페이지에서는 단어 당 뜻을 하나만 보여줌(한 줄씩 깔끔하게!!)
서버단👉🏻 클라의 POST 요청을 받아(단어, 첫 번째 정의만 올 것) words 컬렉션에 저장. 단어 저장하는게 save_word api니까 거기서 작성하자.
@app.route('/api/save_word', methods=['POST'])
def save_word():
    # 단어 저장하기
    word_receive = request.form['word_give']
    definition_receive = request.form['definition_give']
    doc = {"word": word_receive, "definition": definition_receive}
    db.words.insert_one(doc)
    return jsonify({'result': 'success', 'msg': f'word "{word_receive}" saved'})
- 4째줄: 클라가 request에 word_give라는 form으로 post 요청으로 보내는 걸 word_receive로 받는다는 뜻.
- 6째줄: 리시브 두 개를 담아 줄 도큐먼트를 만들자! 딕셔너리를 하나 만들어서, word 필드에는 워드 리시브, definition 필드에는 데피니션 리시브가 들어가도록 함. db에는 데이터들의 묶음인 컬렉션, 컬렉션 안의 각각의 줄은 도큐먼트, 각각의 열에 해당하는 값은 필드.
- 마지막줄: 단어 저장 후 나오는 msg에 내가 무슨 단 어를 저장했는지 같이 담아서 보내줄 수 있음.
클라단👉🏻 클라이언트에서는 단어와 첫번째 정의만 POST 요청으로 보내줌. 단어 저장에 성공하면 얼럿을 띄운 후, status=old로 바뀐 페이지를 띄움. 저장 버튼에 onclick=save_word()로 연결은 이미 되어 있음(10-19)
- 시작 코드:
function save_word() {
    $.ajax({
        type: "POST",
        url: `/api/save_word`,
        data: {},
        success: function (response) {
           alert(response["msg"])
        }
    });
}
👆🏻? 어쩌라고?
일단..ㅋㅋㅋㅋㅋㅋ 우리가 위에 서버 만들 때 detail이란 함수에서 detail.html에 같이 준 게 있음.
@app.route('/detail/<keyword>')
def detail(keyword):
    # API에서 단어 뜻 찾아서 결과 보내기
    r = requests.get(f"https://owlbot.info/api/v4/dictionary/{keyword}", headers={"Authorization": "Token 31820af68f30ba9b32505cf306964a1f5260edba"})
    result = r.json()
    return render_template("detail.html", word=keyword, result=result)
여기 맨 마지막 줄 보셈. word=keyword이건 단어 자체는 word라는 파라미터로 보낸 것이고, result(그 단어의 뜻, 발음 등등등)는 result로 detail.html에 렌더하도록 보내줌. 그래서 우린 그걸 갖고 와서 쓸거야. 이렇게👇🏻
function save_word() {
    $.ajax({
        type: "POST",
        url: `/api/save_word`,
        data: {
            word_give: "{{ word }}",
            definition_give: "{{ result.definitions[0].definition }}"
        },
        success: function (response) {
            alert(response["msg"])
            window.location.href = "/detail/{{ word }}?status_give=old"
        }
    });
}
마지막 줄의 window.location.href = ~? success되면 이제 이 단어는 내 단어장에 저장된 단어니까, 보여주는 페이지도 달라져야 함(삭제 버튼만 존재하게끔) 그래서 word가 끼워 넣어 지고 서버에 주는 주소는 status_give=old
21) 단어 삭제 기능 만들기
서버단👉🏻 단어를 삭제할 때는 단어만 있으면 됨. POST 요청으로 단어를 보내오면, 서버는 해당 단어를 찾아 삭제ㄱ
@app.route('/api/delete_word', methods=['POST'])
def delete_word():
    # 단어 삭제하기
    word_receive = request.form['word_give']
    db.words.delete_one({"word":word_receive})
    return jsonify({'result': 'success', 'msg': f'word "{word_receive}" deleted'})
클라단👉🏻 단어를 보내주고, 단어 삭제에 성공하면 더이상 보여줄 정보가 없으므로 얼럿을 띄운 후 메인 페이지로 이동
- 시작 코드:
function delete_word() {
    $.ajax({
        type: "POST",
        url: `/api/delete_word`,
        data: {},
        success: function (response) {
            alert(response["msg"])
        }
    });
}
- 완성 코드:
function delete_word() {
    $.ajax({
        type: "POST",
        url: `/api/delete_word`,
        data: {
            word_give: '{{ word }}',
        },
        success: function (response) {
            alert(response["msg"])
            window.location.href = "/"
        }
    });
}
12. 목록 페이지 - 전체 모습 만들기
22) CSS 파일 분리하기
1. static 폴더에 mystyle.css 파일을 만들고 공통 요소에 대한 CSS를 잘라내어 붙붙(index.html, detail.html의 공통 요소)
2. 로고 아이콘 url 밑에 빨간줄 그일 것. 그건.. 진자템플릿 언어로 쓴 기존의 것은 stylesheet에서는 쓸 수 없기 때문!(html만 가능) 그러므로 이렇게(background-image: url('logo_red.png');) 바꿔준다(제대로 된 주소를 적을 수도 있고, 어차피 같은 static 폴더 안에 mystyle.css와 logo_red.png 모두 존재하므로 저렇게 간단히 작성 가능)
3. 두 html의 head 부분에 링크를 걸어줌(<link href='{{ url_for("static", filename="mystyle.css") }}' rel="stylesheet">)
4. index.html에 배경과 배너를 넣어 CSS 잘 적용됨을 확인👇🏻
<div class="wrap">
    <div class="banner" onclick="window.location.href = '/'">
    </div>
</div>
23) 검색창과 테이블 만들기
- 검색창:
<body>
<div class="wrap">
    <div class="banner" onclick="window.location.href = '/'"></div>

    <div class="search-box d-flex justify-content-center">
        <input id="input-word" class="form-control" style="margin-right: 0.5rem">
        <button class="btn btn-light" onclick="find_word()"><i class="fa fa-search"></i></button>
    </div>
.search-box {
width: 70%;
margin: 50px auto;
max-width: 700px;
}근데 돋보기 아이콘 안떠?! 폰트어썸 임포트 ㄱㄱ(<link href="//maxcdn.bootstrapcdn.com/font-awesome/4.7.0/css/font-awesome.min.css" rel="stylesheet">)
- 테이블:
<table class="table">
    <thead class="thead-light">
        <tr>
            <th scope="col" style="width:30%">WORD</th>
            <th scope="col">MEANING</th>

        </tr>
    </thead>
    <tbody id="tbody-box">
        <tr id="word-word">
            <td><a href="#">word</a></td>
            <td>a single distinct meaningful element of speech or writing, used with others (or
                sometimes
                alone) to form a sentence and typically shown with a space on either side when written
                or
                printed.
            </td>
        </tr>
        <tr id="word-dictionary">
            <td><a href="#">dictionary</a></td>
            <td>a book or electronic resource that lists the words of a language (typically in
                alphabetical
                order) and gives their meaning, or gives the equivalent words in a different language,
                often
                also providing information about pronunciation, origin, and
            </td>
        </tr>
        <tr id="word-name">
            <td><a href="#">name</a></td>
            <td>a word or set of words by which a person or thing is known, addressed, or referred to.
            </td>
        </tr>
    </tbody>
</table>
.table {
width: 80%;
max-width: 800px;
margin: auto;
table-layout: fixed;
}
.table th {
border-top-style: none;
}
td {
background-color: white;
text-overflow: ellipsis;
overflow: hidden;
white-space: nowrap;
}
td > a, a:visited, a:hover, a:active {
color: black;
}
thead:first-child tr:first-child th:first-child {
border-radius: 10px 0 0 0;
}
thead:first-child tr:first-child th:last-child {
border-radius: 0 10px 0 0;
}
tbody:last-child tr:last-child td:first-child {
border-radius: 0 0 0 10px;
}
tbody:last-child tr:last-child td:last-child {
border-radius: 0 0 10px 0;
}13. 목록 페이지 - 단어 목록 가져오기
24) jinja2로 단어 목록 테이블 채우기: 이제 실제로 DB에서 단어 목록을 가져와 테이블을 채워보자!!!!!
↳테이블 한 번 띄우고 나면 걔 자체를 수정할 일은 없으므로 서버에서 진자2로 렌더링 다 해서 완성된 html로 보내주기.
- app.py에서는 words 컬렉션의 단어들을 가져와 넘겨줌
@app.route('/')
def main():
    # DB에서 저장된 단어 찾아서 HTML에 나타내기
    words = list(db.words.find({}, {"_id": False}))
    return render_template("index.html", words=words)
👆🏻{"_id" : False}는 뭐? 이게.. _id가 몽고db에서 자동으로 만들어주는 id값인데, 자료형이 특이해서 얘가 들어있는 리스트를 그대로 render_template에 넣어주면 오류가 남.
👆🏻원래는 마지막줄이 return~.html")이렇게만 되어 있었는데 뒤에 words(db에서 가져온 words 컬렉션)도 words로 보내준다는 것 하나 추가함!
- index.html에서는 방금 words라고 보내준 값을 받아서 각 단어마다 테이블의 한 줄이 되도록(tr) 넣는다. 한 줄만 만들거니까 일단 기존의 것(3개) 중 2개 날리고 한개만 남김. 결과👇🏻
<table class="table">
    <thead class="thead-light">
        <tr>
            <th scope="col" style="width:30%">WORD</th>
            <th scope="col">MEANING</th>
        </tr>
    </thead>

    <tbody id="tbody-box">
        <tr id="word-word">
            <td><a href="#">word</a></td>
            <td>a single distinct meaningful element of speech or writing, used with others (or
                sometimes
                alone) to form a sentence and typically shown with a space on either side when written
                or
                printed.
            </td>
        </tr>
    </tbody>
</table>
여기서 for문 돌면서 하나의 단어당 각각의 tr 만들어 주자.
<tbody id="tbody-box">
    {% for word in words %}
        <tr id="word-{{ word.word }}">
            <td><a href="/detail/{{ word.word }}?status_give=old">{{ word.word }}</a></td>
            <td>{{ word.definition|safe }}</td>
        </tr>
    {% endfor %}
</tbody>
👆🏻여기서 <tr id="word-{{ word.word }}">?
tr마다 id를 주는데, 형식이 "word-그 단어에 해당하는 문자열" 이렇게 됨.
👆🏻여기서 <td><a href="/detail/{{ word.word }}?status_give=old">{{ word.word }}</a></td>?
일단 <td><a href="#">word</a><td>에서 첫 번째 셀에 들어가는건 단어 자체니까 <td><a href="#">{{ word.word }}</a></td>로 적고, 그 단어를 클릭하면 상세페이지로 넘어가도록 해야 하는데 a태그 이용하면 된다. 그 주소가 /detail/{{ word.word }}하고 이제 상태가 old로 바뀌니 바로 이어서 ?status_give=old"라고 적고 old 주소로 보내주면 됨!
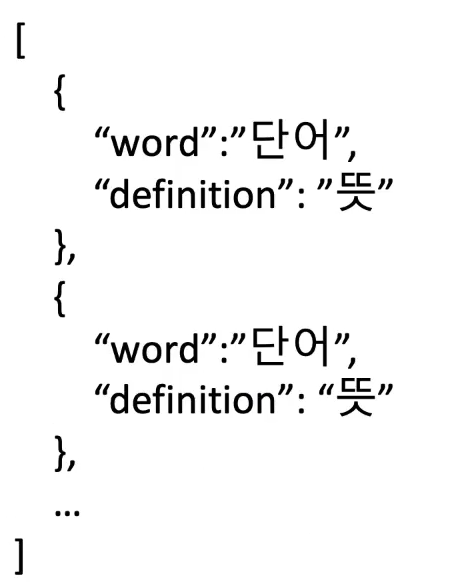
app.py에서 데이터를 줄 때 아래👇🏻처럼 list가 있고[ ], 그 안에 하나의 요소가 딕셔너리인데{ }, 걔네의 키가 워드, 키가 데피니션 이런 식으로 들어온 것.
14. 목록 페이지 - 검색 기능 만들기
25) 단어 검색 기능 만들기
1. 단어를 검색했을 때 이미 저장된 단어인지 알기 위해서 있는 단어 리스트를 만든다. 어떻게?! 일단, app.py의 main함수에서 (def main()) words라는 이름으로 단어들의 목록을 index.html로 보내줌👇🏻
@app.route('/')
def main():
    # DB에서 저장된 단어 찾아서 HTML에 나타내기
    words = list(db.words.find({}, {"_id": False}))
    return render_template("index.html", words=words)
👆🏻이거!!ㅋㅋ
할튼 그건 그렇고,, list 만들기
<script>
    let words = {{ words|tojson }};  //따옴표가 데이터임을 알려주려고 |tojson..(뭔말인지 모름)
    let word_list = [];
    for (let i = 0; i < words.length; i++) {
        word_list.push(words[i]["word"])
    }
2. 단어를 검색했을 때 단어 리스트에 있는 경우에는 해당 행을 하이라이트, 없는 단어일 때는 단어 상세페이지로 넘김.
0] 버튼은 이미 코드 붙어있음(onclick="find_word()")
1] 일단 input에 뭐가 들어있는지 받자. input의 id가 "input-word"이므로 걔의 값을 달러콜링(제이쿼리-자바스크립문법)으로 받아서 변수 word에 저장. 그리고 얘들은 대/소문자 관계 없이 검색 작동해야하니까 LowerCase 함수 적어줌.
2] include 함수 쓰자. if (word_list.include(word))이건 word_list라는 리스트 안에 word가 include 되었냐?! 하는 것
3] 리스트에 있으면 하이라이트, 없으면 새 단어를 위한 상세페이지로 이동하도록 코드 짜보자.
- 리스트에 없는 경우는 쉬움. 그냥 window.location.href = `/detail/${word}?status_give=new`
- 하이라이트는 클래스로 해줄것. 일단 tr이라는 목록 하나에 대해서 할거니까, 거기에 클래스 적용해줄거야. 밑에서 계속.
<script>
    let words = {{ words|tojson }};
    let word_list = [];
    for (let i = 0; i < words.length; i++) {
        word_list.push(words[i]["word"])
    }

    function find_word() {
        let word = $("#input-word").val().toLowerCase();
        if (word == "") {
                    // 빈 문자열이면 얼럿
            alert("please write something first :)")
            return
        }
        if (word_list.includes(word)) {
                    // 리스트에 있으면 하이라이트
            $(`#word-${word}`).addClass('highlight').siblings().removeClass('highlight');
            $(`#word-${word}`)[0].scrollIntoView();
        } else {
                    // 리스트에 없으면 상세 페이지로
            window.location.href = `/detail/${word}?status_give=new`
        }
    }
- 보면.. $(`#word-${word}`).addClass('highlight').siblings().removeClass("highlight") 얘는: id값이 "word-${word}"인 애한테 하이라이트라는 클래스를 더해줘!한 것(아직 어떤식으로 하이라이트 될지는 안줌!! 그건 CSS!!!) 글고 우리가 단어를 여러개 추가하면.. 그게 index.html이나 app.py에는 전혀 보이지 않을지언정, 서버에는 그게 다 들어가있잖아? 그리고 index.html열면 그것들도 다 불러와지고. 그러므로 tbody 안에 tr이 여러개가 붙는겨👇🏻

여기서 다른 형제 tr들의 하이라이트를 제거하지 않으면... 찾아보는 단어마다 계속~! 하이라이트가 들어와있어. 그럼 노노니까ㅋ_ㅋ 하나가 하이라이트되면 다른것의 하이라이트는 해제되도록 하는 것!! scroll~ 어쩌고는, 우리가 찾은 단어가 스크롤상 어디에 있든 걔를 찾아서 스크롤에 들어오게 해라!! 라는 뜼이야.
- 하이라이트 CSS:
tr.highlight > td {
    background-color: #e8344e;
    color: white;
}

tr.highlight a {
    color: white;
}
15. 목록 페이지 - 사전에 없는 단어일 때
26) 단어가 존재하지 않을 때 기능 만들기
- 주소에 단어가 아닌 것을 넣었을 때, 사전 API에서 단어를 찾을 수 없기 때문에 에러가 남. 이 때 에러를 보여주지 않고 단어 목록 페이지로 리다이렉팅시키자~!
1. 값을 잘 받아왔을 때 상태 코드가 200이므로 200이 아닐 때 main으로 리다이렉팅 시키자.
if r.status_code != 200:   //status_code는 기본으로,, 원래 있는 것. 뭣에 대해 쓸건지는 적어야(r.~)
        return redirect(url_for("main"))
위에꺼 넣어서 아래가 결과
@app.route('/detail/<keyword>')
def detail(keyword):
    status_receive = request.args.get("status_give")
    # API에서 단어 뜻 찾아서 결과 보내기
    r = requests.get(f"https://owlbot.info/api/v4/dictionary/{keyword}", headers={"Authorization": "Token 31820af68f30ba9b32505cf306964a1f5260edba"})
    if r.status_code != 200:
        return redirect(url_for("main")
    result = r.json()
    return render_template("detail.html", word=keyword, result=result, status=status_receive)
2. 단어 찾기 실패 얼럿을 띄우려면 redirect()에 메세지를 같이 전달하자.
url_for("main", msg="Word not found in dictionary; Try another word")  //원래는 ("main")이
다였잖아. 그 뒤에 저렇게 msg를 같이 파라미터로 보낼 수 있는 것~!(이렇게 한다고 바로 알람이
뿅!!! 뜨는게 아니라....ㅎㅎ 그러면 좋겠지만...ㅠㅋㅋㅋㅋㅋㅋ @app.route('/')의 main()함수에서
msg args 받으면 보내주라고 저기서 같이 실어 보내야 함.

👇🏻이렇게
@app.route('/')
def main():
    # DB에서 저장된 단어 찾아서 HTML에 나타내기
    msg = request.args.get("msg")
    words = list(db.words.find({}, {"_id" : False}))
    return render_template("index.html", words=words, msg=msg)
위에꺼 넣어서 아래가 최종 결과
@app.route('/detail/<keyword>')
def detail(keyword):
    status_receive = request.args.get("status_give")
    # API에서 단어 뜻 찾아서 결과 보내기
    r = requests.get(f"https://owlbot.info/api/v4/dictionary/{keyword}", headers={"Authorization": "Token 31820af68f30ba9b32505cf306964a1f5260edba"})
    if r.status_code != 200:
        return redirect(url_for("main", msg = "There is no such word"))
    result = r.json()
    return render_template("detail.html", word=keyword, result=result, status=status_receive)
3. index.html에서 메세지 얼럿 띄우자
<script>
            {% if msg %}
                alert("{{ msg }}")
            {% endif %}
            let words = {{ words|tojson }};
            .....
27) og태그, favicon 넣기
favicon? 인터넷 웹 브라우저의 주소창에 표시되는 웹사이트나 웹페이지를 대표하는 아이콘
1] 일단 아이콘 이미지는 static 폴더에 넣자
2] index.html과 detail.html의 head의 title 밑에 아래 코드 복붙하자(당연히 title, description, image 다 네 임의로 하면 되고 filename은 네가 원하는 이미지 파일명으로 달라짐~!)
<meta property="og:title" content="Sparta Vocabulary Notebook"/>
<meta property="og:description" content="mini project for Web Plus"/>
<meta property="og:image" content="{{ url_for('static', filename='logo_red.png') }}"/>
<link rel="shortcut icon" href="{{ url_for('static', filename='favicon.ico') }}" type="image/x-icon">
<link rel="icon" href="{{ url_for('static', filename='favicon.ico') }}" type="image/x-icon">
'개발 > 항해99 9기' 카테고리의 다른 글
| 항해99) 1주차:: 웹개발+ 3주차; Selenium으로 스크래핑 (0) | 2022.09.21 |
|---|---|
| 항해99) 1주차:: 웹개발+ 2주차; SSR(Server Side Rendering) WORDBOOK 전체 코드 (0) | 2022.09.21 |
| 항해99) 1주차:: 웹개발+ 1주차; 파일 업로드 (0) | 2022.09.19 |
| 📚지금까지 헷갈리는 것 정리 (0) | 2022.09.09 |
| 항해99) 웹종 5주차 웹서비스 런칭 (0) | 2022.09.06 |


